Archive for ‘Copy & Paste’

August 20, 2013

Mutable variable capture in anonymous Java classes

by Jay Jonas


The Java compiler requires local variables of enclosing contexts referenced in anonymous classes (so-called captured variables) to be final. What if the anonymous class wants to alter the value of the variable, i.e. requires the variable to be mutable? This post shows different ways how to achieve that.

Mutability with an array

The most common way to solve this problem is to put the variable into an array of length one, make the array final and capture the array:

<br /><%%KEEPWHITESPACE%%>   JButton button = new JButton("Press me!");<br /><%%KEEPWHITESPACE%%>   final String[] message = new String[]{"Never been pressed"};<br /><%%KEEPWHITESPACE%%>   button.addActionListener(new ActionListener() {<br /><br /><%%KEEPWHITESPACE%%>      @Override<br /><%%KEEPWHITESPACE%%>      public void actionPerformed(ActionEvent e) {<br /><%%KEEPWHITESPACE%%>         message[0] = "Pressed";<br /><%%KEEPWHITESPACE%%>      }<br /><br /><%%KEEPWHITESPACE%%>   });<br />

The value is stored in the first slot of the array. The reference to the array is final but its element stays mutable.

While this approach works fine, it looks strange and will certainly raise questions for developers in your team which have never seen this construct before.

Mutability with a holder

The better way to make the message mutable is to put it into a holder class

<br /><%%KEEPWHITESPACE%%>    class Holder {<br /><%%KEEPWHITESPACE%%>        private T value;<br /><br /><%%KEEPWHITESPACE%%>        Holder(T value) {<br /><%%KEEPWHITESPACE%%>            setValue(value);<br /><%%KEEPWHITESPACE%%>        }<br /><br /><%%KEEPWHITESPACE%%>        T getValue() {<br /><%%KEEPWHITESPACE%%>            return value;<br /><%%KEEPWHITESPACE%%>        }<br /><br /><%%KEEPWHITESPACE%%>        void setValue(T value) {<br /><%%KEEPWHITESPACE%%>            this.value = value;<br /><%%KEEPWHITESPACE%%>        }<br /><%%KEEPWHITESPACE%%>    }<br />

and pass the holder into the inner class:

<br /><%%KEEPWHITESPACE%%>   JButton button = new JButton("Press me!");<br /><%%KEEPWHITESPACE%%>   final Holder mutableMessage = new Holder("Never been pressed");<br /><%%KEEPWHITESPACE%%>   button.addActionListener(new ActionListener() {<br /><br /><%%KEEPWHITESPACE%%>      @Override<br /><%%KEEPWHITESPACE%%>      public void actionPerformed(ActionEvent e) {<br /><%%KEEPWHITESPACE%%>         mutableMessage.setValue("Pressed");<br /><%%KEEPWHITESPACE%%>      }<br /><br /><%%KEEPWHITESPACE%%>   });<br />

This solution states more clearly why the message has been wrapped. If the holder is implemented as a generic utility class, this solution is not more verbose than the one with the array. In case you don’t want to implement the Holder class yourself, you can also reuse the MutableObject from Apache Commons or the Holder from Google Guava. One could argue that the solution with the array is faster (creating an array is usually faster than instantiating a class), but in most cases the performance loss will be negligible.

// from at eclipsesource.com/blogs

 
August 5, 2013

Running javah tool from Eclipse

by Jay Jonas

The javah produces C header files and C source files from a Java class that are needed to implement native methods. The javah -jni is used to generate a C header file containing the function prototype for the native method implementation.

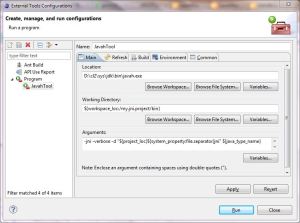
The javah can be configured as an external tool like this: click Run |External Tools |External Tools Configurations. This will invoke External Tools Configurations wizard.

Select Program Type and create a new launch configuration.

For Location, click on Browse File System and browse to the path of javah tool (typically <java_home>\bin).

For Working Directory, click on Browse Workspace and select upto project output directory (directory where class files reside – typically ${workspace_loc:/your.jni.project/bin})

Various options of javah command may be added here which is then followed by ${java_type_name} workspace variable which returns the fully qualified Java type name of the primary type in the selected resource.

The argument list instructs the tool to keep the generated header file in a directory named jni under the project folder. If -d option is not specified, the header files will be stored in bin folder itself.

"${project_loc}${system_property:file.separator}jni" ${java_type_name}
External Tools Configuration

External Tools Configuration

// That’s all, folks!

February 10, 2013

Access forbidden! New XAMPP security concept fix

by Jay Jonas

XAMPP is a great tool for developers running Windows. But if you are using virtual hosts and maybe you are stuck on  this error message:

Access forbidden! New XAMPP security concept

Open httpd-xampp.conf which is at  <xampp_path>/apache/conf/extra/

Comment this section:

 #
 # New XAMPP security concept
 #
 #<LocationMatch "^/(?i:(?:xampp|security|licenses|phpmyadmin|webalizer|server-status|server-info))">
 # Order deny,allow
 # Deny from all
 #
 # Allow from ::1 127.0.0.0/8 \
 # fc00::/7 10.0.0.0/8 172.16.0.0/12 192.168.0.0/16 \
 # fe80::/10 169.254.0.0/16 192.168.1.0/16
 #
 # ErrorDocument 403 /error/XAMPP_FORBIDDEN.html.var
 #</LocationMatch>

And insert these sections as  following:

#
# New XAMPP security concept
#

 # Close XAMPP security section here
 <LocationMatch "^/(?i:(?:security))">
     Order deny,allow
     Deny from all
     Allow from ::1 127.0.0.0/8
     ErrorDocument 403 /error/HTTP_XAMPP_FORBIDDEN.html.var
 </LocationMatch>

# Close XAMPP sites here
 <LocationMatch "^/(?i:(?:xampp|licenses|phpmyadmin|webalizer|server-status|server-info))">
     Order deny,allow
     Deny from all
     Allow from ::1 127.0.0.0/8
     ErrorDocument 403 /error/HTTP_XAMPP_FORBIDDEN.html.var
 </LocationMatch>

#
# My VHosts security concept
#
# if you are using virtual hosts
# stored outside of xampp folders
#
<DirectoryMatch "D:/dev/wwwroots/(.*)/wwwroot/*">
    Order deny,allow
    Deny from all
    Allow from 127.0.0.0/8

    ErrorDocument 403 /error/HTTP_XAMPP_FORBIDDEN.html.var
</DirectoryMatch>

Then now open http-vhosts.conf that is into the same location.

Add this section:

<VirtualHost *:80>
     DocumentRoot "D:/path/to/xampp/htdocs"

     ServerName localhost:80
     <Directory "D:/path/to/xampp/htdocs">
         IndexOptions +FancyIndexing NameWidth=*
         Options Includes FollowSymLinks Indexes ExecCGI
         AllowOverride All
         Require all granted
     </Directory>
 </VirtualHost>

Finally a sample for setting a virtual host stored in a different folder:

<VirtualHost *:80>
     ServerAdmin webmaster@dev.sample.com
     DocumentRoot D:/dev/wwwroots/dev.sample.com/wwwroot

     ServerName dev.sample.com
     ServerAlias dev.sample.com *.dev.sample.com

     ErrorLog D:/dev/wwwroots/dev.sample.com/logs/error_log.txt
     CustomLog D:/dev/wwwroots/dev.sample.com/logs/access_log.txt common

     <Directory "D:/dev/wwwroots/dev.sample.com/wwwroot">
         IndexOptions +FancyIndexing NameWidth=*
         Options Includes FollowSymLinks Indexes ExecCGI
         AllowOverride All
         Require all granted
     </Directory>
 </VirtualHost>
September 3, 2012

How to delete a print job that is stuck in the print queue

by Jay Jonas

Printing problems are some of the most frustrating problems that we experience as computer users.

Last week I had some problems with stuck network printer jobs in Windows 2003 Server. Forget to press Cancel button. Forget to turn off and on your printer. Forget the Control Panel. Go straight forward to the core of the problem, be radical.

Start Notepad and write down the following command:

@echo off
pause Press ENTER to continue or CTRL+C to Cancel
net stop spooler
del %systemroot%\system32\spool\printers\*.shd
del %systemroot%\system32\spool\printers\*.spl
net start spooler
pause The Command Script has finished. Press ENTER to exit.

Save this to a command script text file and named it as DeletePrintJobs.bat. Save it where you could easy find it. For example, save it in C:\.

Now that you have created the command script file, you will run it. To run it, you will write the name of the command script file in the Run box, including the path where you save it.

Click Start, and then click Run. In the Open box, write C:\DeletePrintJobs.bat and Click OK.

Notice that the Command Prompt window opens to run the command script file that you created. Notice also that this window will wait for a confirmation when starting and also when finishing. If you do not see the Command Prompt window open, check that you saved the command script file by using the correct name and that you entered the correct command script file name in the Run box.

Note 1 If this method does not work the first time, or if you cannot print anything after you use this method, restart your computer, double check for typo errors and then try again.

Note 2 To use this method, you must have Computer Administrator status

December 19, 2011

Permanent workaround

by Jay Jonas

Anonymous guy wrote elsewhere:

So a few months ago while converting the PHX platform from 3 to 4 I found a comment:

// RM 6-22-2007 Temporary workaround

Ha ha, it’s still there. I will go revise it today to:

// RM 6-22-2007 Temporary workaround
// SB 1-13-2011 Permanent workaround

Tags:
October 16, 2011

java.net.BindException: Address already in use: JVM_Bind

by Jay Jonas

Just have some fun with Java sockets API in a Windows enviroment? So, what I could I say, just happens! Here is a solution.

Open the Command Prompt and follows these steps:

  • Find out if tcp port is really in use:
C:> netstat -na
  • Find out which process is binded on that por, in case it’s in use:
C:> netstat -abnovp tcp
This command may be a litte slow to return their results
  • To kill the process, take the PID (Process ID) in the lastest column and run this command:
C:> taskkill /pid <process_id_goes_here> /f

Finally, you can download the TCPView, a freebie from Microsoft.

TCPView is a Windows program that will show you detailed listings of all TCP and UDP endpoints on your system, including the local and remote addresses and state of TCP connections.
 

// http://technet.microsoft.com/en-us/sysinternals/bb897437

A more little tip: fix your sofware!

Tags: ,
October 4, 2011

JavaBeans PropertyChangeSupport Template

by Jay Jonas

Property-change events occur whenever the value of a bound property changes for a java bean. You can use a Eclipse template to help you to write all the standard setter code

Open Windows | Preferences. Browse to Java | Editor | Templates. Click on New and enter property_change_support as Name, choose Java Statements as Context and mark Automatically Insert option. Write a meaning description as “property change support for setter method” and copy & paste into Pattern the code as follows:

if (this.${enclosing_method_arguments} == null && ${enclosing_method_arguments} == null) {
return;
}
propertyChangeSupport.firePropertyChange("${enclosing_method_arguments}", this.${enclosing_method_arguments}, ${word_selection})

Take care about that there is no new line at the end of the last line.
Take notes and will never forget it.

August 6, 2011

How to remove unwanted Preference Pages

by Jay Jonas

Remove them in the ApplicationWorkbenchWindowAdvisor.postWindowCreate():

PreferenceManager pm = PlatformUI.getWorkbench( ).getPreferenceManager();
pm.remove("org.eclipse.ui.preferencePages.Workbench");

The org.eclipse.ui.preferencePages.Workbench id removes the “General” preference page group. If you don’t know the id for the page you want to remove, so you can first try to print them like this:

PreferenceManager pm = PlatformUI.getWorkbench( ).getPreferenceManager();
IPreferenceNode[] arr = pm.getRootSubNodes();

for(IPreferenceNode pn:arr){
 System.out.println("Label:" + pn.getLabelText() + " ID:" + pn.getId());
}
July 17, 2011

Eclipse API baseline warning

by Jay Jonas

In case you encounter the warning “An API baseline has not been set for the current workspace” you can disable this type of warning.

Eclipse Problems View

In order to solve this, you go to your Eclipse Preferences and then select Plug-In Development/API baselines.
Here you can set an API baseline or set missing API baseline to Ignore.
An API baseline defines an eclipse API against which your code is compared and checked for compatibility.
To se an API base line, click on Add Baseline… and in New API Baseline dialog select the path to eclipse installation you intend to use as your baseline.

Rebuild the project afterwards.


March 6, 2011

Error 1747: The Authentication Service is Unknown

by Jay Jonas

Do not ask me why, my notebook Windows 7 64-bit woke up this morning bothering me with this error

Windows Could not start the Windows Event Log service on Local Computer.
Error 1747: The authentication service is unknown.

I will not even attempt to look for explanations, not worth it. The solution to so, at least in my case, was to follow the steps below:

  • Go to the Start Menu, type cmd and right click or (Ctrl + Shift and hit Enter), and select “Run As Administrator”.
  • Type the following commands, each followed by pressing enter.
ipconfig /flushdns
nbtstat -R
nbtstat -RR
netsh int reset all
netsh int ip reset
netsh winsock reset
netsh interface tcp set global autotuninglevel=disabled

// http://support.microsoft.com/kb/811259